
You'll see the Groups tab if you have Content, People, Group, Global view, or Super Admin access. From there, you can search for and manage the Groups you're in. You can also create new Groups.
Group creation
To create a new Group, select the add button ![]() in the top right corner of the page. This will produce the Group creation form with the following tabs:
in the top right corner of the page. This will produce the Group creation form with the following tabs:
- Details: Contains the title field, description field, and the Default Group access toggle. A title is required for saving.
- People: Contains all people associated with the Group
- Collections: Contains all Collections associated with the Group
- Content Banners: Contains all Banners associated with the Group
- Announcements: Contains all Announcements associated with the Group
- Folders: Contains all folders associated with the Group
- Content: Contains all Content associated with the Group
Note: If you're a Content or People Admin, you'll have limited access in this area. For example, since Content Admins can't edit people, they won't have access to update the People tab.
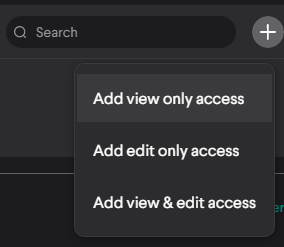
The items in these tables are associated to the Group by access type. This is done using the add button ![]() in the top right corner of the table to produce the access type selector. Once the access type is selected, the modal will display the list of existing items to add.
in the top right corner of the table to produce the access type selector. Once the access type is selected, the modal will display the list of existing items to add.
The access type menu looks like this while it's open:
Creating new items while adding them to a Group
Once the access type is selected for any of the navigation tabs listed above, you'll be taken to the add modal, where you can select existing items that your current Groups have associated with them. You can also create new items directly from the add modal by selecting the add button ![]() in the top right corner of the add table.
in the top right corner of the add table.
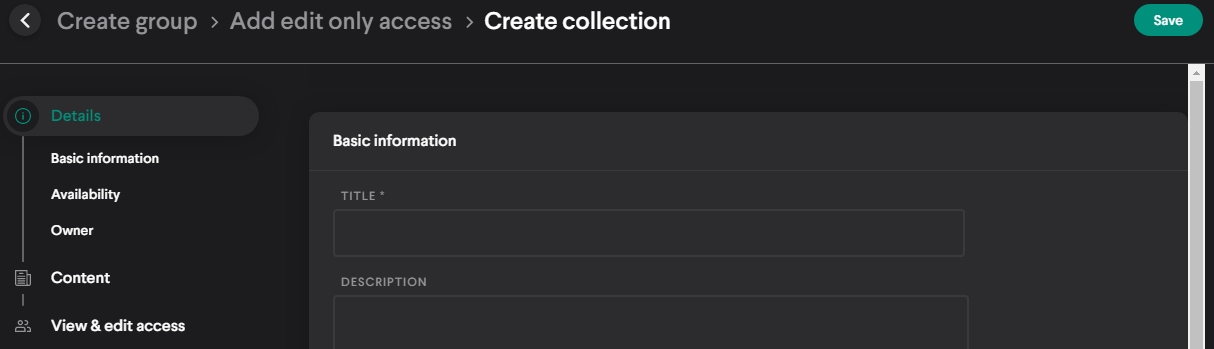
For example, if you select the Collections tab, select the add button ![]() to add a collection and then select the add button
to add a collection and then select the add button ![]() again at the add modal, you can then create a new collection right there on the spot.
again at the add modal, you can then create a new collection right there on the spot.
The upper portion of the add modal looks like this:

After the add button ![]() is selected from the previous screen, you'll see the following:
is selected from the previous screen, you'll see the following:
Confirming the creation modal will create the item, return you to the Add modal, and automatically add the new item to what you already have selected in the add modal.
Default Group access
In the Details tab, there's a "Make default Group" toggle. When this is enabled and the creation or edit form has been saved, all current and future users in the tenant will get added to that Group. Disabling the toggle doesn't remove any users from the Group. Any number of Groups within a tenant can have this enabled at the same time. You can filter the Admin Groups table to quickly identify all the default Groups in the tenant.
Users created through a roster import or through the accreditation add-on will be automatically added to all default Groups.

Editing a Group
To edit from the Group table, follow these steps:
- Select the Admin primary tab at the top of the page.
- Select the Groups tab.
- Find the Group you wish to edit with the table controls and hover over the table row.
- Select the Edit button
 that appears on the right side of the row.
To edit from the detail view, follow these steps:
- Select the Admin primary tab at the top of the page.
- Select the Groups tab.
- Find the Group you wish to edit with the table controls and select the row of the item.
- You'll now be in the detail view for the Group. From here, select the Edit button located near to the top right corner of the detail area.
Deleting Groups
Groups can be deleted from either the Group table or the detail view of the Group by selecting the more button ![]() and then the Delete option. If you're in the table view, the more button
and then the Delete option. If you're in the table view, the more button ![]() appears when you hover over the row of the Group you wish to delete.
appears when you hover over the row of the Group you wish to delete.
WARNING: Since Groups act as the primary method of association in Loop, please be aware of how any associated people or items will be affected by the deletion. Group deletion may leave people, Content, and other items inaccessible to Learners and other Admins. If you delete a Group on accident, you'll have to restore everything manually.
Comments
0 comments
Please sign in to leave a comment.